Here is my activity_main.xml
<LinearLayout xmlns:android="http://schemas.android.com/apk/res/android"
xmlns:tools="http://schemas.android.com/tools"
android:layout_width="match_parent"
android:layout_height="match_parent"
android:paddingBottom="@dimen/activity_vertical_margin"
android:paddingLeft="@dimen/activity_horizontal_margin"
android:paddingRight="@dimen/activity_horizontal_margin"
android:paddingTop="@dimen/activity_vertical_margin"
tools:context=".MainActivity"
android:orientation="vertical">
<LinearLayout
android:layout_width="match_parent"
android:layout_height="wrap_content"
android:orientation="horizontal">
<EditText
android:id="@+id/category_edit"
android:layout_height="wrap_content"
android:layout_width="250dp"
android:text="@string/edit_category"
android:inputType="text"/>
</LinearLayout>
<LinearLayout
android:layout_width="match_parent"
android:layout_height="wrap_content"
android:orientation="horizontal">
<EditText
android:id="@+id/product_edit"
android:layout_width="250dp"
android:layout_height="wrap_content"
android:text="@string/edit_product"
android:inputType="text"/>
</LinearLayout>
<LinearLayout
android:layout_width="match_parent"
android:layout_height="wrap_content"
android:orientation="horizontal">
<Button
android:id="@+id/add_product_btn"
android:layout_width="wrap_content"
android:layout_height="wrap_content"
android:text="@string/add_product_btn"/>
<Button
android:id="@+id/update_product_btn"
android:layout_width="wrap_content"
android:layout_height="wrap_content"
android:text="@string/update_product_btn"/>
<Button
android:id="@+id/delete_product_btn"
android:layout_width="wrap_content"
android:layout_height="wrap_content"
android:text="@string/delete_product_btn"/>
</LinearLayout>
<ListView android:id="@+id/products_view"
android:layout_width="wrap_content"
android:layout_height="wrap_content"
/>
</LinearLayout>
It looks like this:
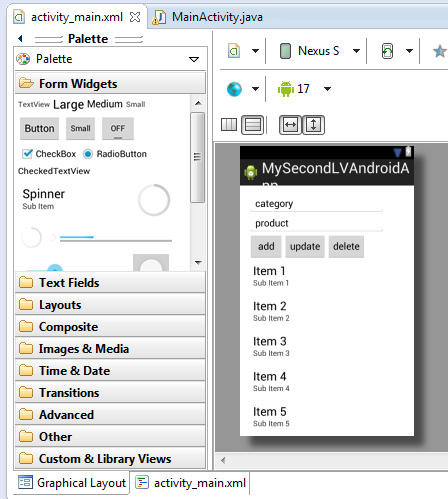
Basically I have two edit text fields. In the first I edit product category and in the second I edit the product name. When I press add new item is added in the list view below. I keep track of current list item with integer index number and I increment or decrement it when adding or deleting item from the list. I added simple validation for the input data. I guess it is not enough but it will do good for this post. I used something like this for validation:
Toast.makeText(v.getContext(), "Error message", Toast.LENGTH_LONG).show();
Here is my code:
package com.example.mysecondlvandroidapp;
import java.util.ArrayList;
import java.util.List;
import android.os.Bundle;
import android.app.Activity;
import android.view.Menu;
import android.view.View;
import android.view.View.OnClickListener;
import android.widget.AdapterView.OnItemClickListener;
import android.widget.AdapterView;
import android.widget.ArrayAdapter;
import android.widget.Button;
import android.widget.EditText;
import android.widget.ListView;
import android.widget.Toast;
public class MainActivity extends Activity {
private int currentProductIndex = -1;
private List<String> productsList = new ArrayList<String>();
private EditText categoryEdit = null;
private EditText productEdit = null;
private Button addProductBtn = null;
private Button updateProductBtn = null;
private Button deleteProductBtn = null;
private ArrayAdapter<String> adapter = null;
private ListView productsView = null;
@Override
protected void onCreate(Bundle savedInstanceState) {
super.onCreate(savedInstanceState);
setContentView(R.layout.activity_main);
initView();
}
private void initView() {
this.categoryEdit = (EditText) findViewById(R.id.category_edit);
this.productEdit = (EditText) findViewById(R.id.product_edit);
this.addProductBtn = (Button) findViewById(R.id.add_product_btn);
this.addProductBtn.setOnClickListener(new OnClickListener() {
@Override
public void onClick(View v) {
String categoryStr = categoryEdit.getText().toString();
if (categoryStr.equals("category")) {
Toast.makeText(v.getContext(), "Edit category!",
Toast.LENGTH_LONG).show();
} else {
String productStr = productEdit.getText().toString();
if (productStr.equals("product")) {
Toast.makeText(v.getContext(), "Edit product!",
Toast.LENGTH_LONG).show();
} else {
String listViewItem = categoryStr + " - " + productStr;
currentProductIndex += 1;
adapter.add(listViewItem);
}
}
}
});
this.updateProductBtn = (Button) findViewById(R.id.update_product_btn);
this.updateProductBtn.setOnClickListener(new OnClickListener() {
@Override
public void onClick(View v) {
if (currentProductIndex > -1) {
String categoryStr = categoryEdit.getText().toString();
String productStr = productEdit.getText().toString();
String listViewItem = categoryStr + " - " + productStr;
productsList.set(currentProductIndex, listViewItem);
runOnUiThread(new Runnable() {
@Override
public void run() {
adapter.notifyDataSetChanged();
}
});
} else {
Toast.makeText(v.getContext(), "List is empty!",
Toast.LENGTH_LONG).show();
}
}
});
this.deleteProductBtn = (Button) findViewById(R.id.delete_product_btn);
this.deleteProductBtn.setOnClickListener(new OnClickListener() {
@Override
public void onClick(View v) {
if (currentProductIndex > -1) {
productsList.remove(currentProductIndex);
currentProductIndex -= 1;
runOnUiThread(new Runnable() {
@Override
public void run() {
adapter.notifyDataSetChanged();
}
});
} else {
Toast.makeText(v.getContext(), "List is empty!",
Toast.LENGTH_LONG).show();
}
}
});
this.adapter = new ArrayAdapter<String>(this,
android.R.layout.simple_list_item_1, productsList);
this.productsView = (ListView) findViewById(R.id.products_view);
this.productsView.setAdapter(adapter);
this.productsView.setOnItemClickListener(new OnItemClickListener() {
@Override
public void onItemClick(AdapterView<?> arg0, View arg1, int arg2,
long arg3) {
Toast.makeText(arg1.getContext(), productsList.get(arg2),
Toast.LENGTH_SHORT).show();
}
});
}
@Override
public boolean onCreateOptionsMenu(Menu menu) {
// Inflate the menu; this adds items to the action bar if it is present.
getMenuInflater().inflate(R.menu.main, menu);
return true;
}
}
I run this function:
runOnUiThread(new Runnable() {
@Override
public void run() {
adapter.notifyDataSetChanged();
}
});
after updating or deleting to update the ListView with new changes. I guess there is a better way to do this but for now I think it is ok.
Here are some of the screen shots I made developing this small application.
 |
| There was an extra button for category. I removed it. |
 |
| Add product functionality. |
 |
| update and delete functionality |
 |
| Test on Nexus 7 AVD |

