Showing posts with label tutorial. Show all posts

Friday, October 10, 2014

Screen Capture tutorial with FFMPEG on Windows

Beautiful tutorial video.
Links: 
https://trac.ffmpeg.org/wiki/Capture/Desktop
http://antumdeluge.wordpress.com/2014/02/19/recording-screen-windows-desktop-using-ffmpeg/

Thursday, July 25, 2013

Simple Gallery App in Android

I have recently worked on a simple Gallery application in Android.

It has one ImageView component, two buttons, previous and next and one TextView for description. It is a gallery application for European cars. Actually I have 27 car brands and one model (image) for each brand. I added 27 images which are all 640 x 480 pixels (You can download images from Google) into CarTestApp/res/drawable-mdpi folder.

I was testing my app on Nexus 7 AVD emmulator.

Here is how you application should look like.


I will show you some tricks I used in this small app, like how to access all drawable objects.

Ok so here is my layout file:


My strings.xml file

<?xml version="1.0" encoding="utf-8"?>
<resources>

    <string name="app_name">CartTestApp</string>
    <string name="action_settings">Settings</string>
    <string name="hello_world">Hello world!</string>
    <string name="image_view">Image description</string>
    <string name="prev_btn">prev</string>
    <string name="next_btn">next</string>
    <string name="car_name_text_view">Car Name</string>
</resources>


I added Utils.java file for a helper function. It is only one function but I guess I will expand the application future.

Utils.java:

package com.testpkg.carttestapp;

public class Utils {
    public static String formatFirstLetterOfString(String str) {
        String result = "";

        result = str.substring(0, 1).toUpperCase()
                + str.substring(1).toLowerCase();

        return result;
    }
}


Next class I added is called CarNames.java. It has many static functions so that I don't need to instantiate an object of this class. No need to.

Here it is:


Check these lines:

public static Field[] nativeDrawables = android.R.drawable.class
            .getFields();

public static Field[] drawables = com.testpkg.carttestapp.R.drawable.class
            .getFields();


Function getFields() returns the fields in a given resource from our application.

For example android.R.drawable contains native android drawable resources while com.testpkg.cartestapp.R.drawable contains drawable resources that we have added to our application.

So actually we can search our resources with code.

I have two ArrayList objects, one for drawable ids and one for drawable string names. I also have a hash map with drawable id as a key and car string name as a value.

Here is the reset() function in which I fill my lists and the hash map:

public static void reset() {

     for (Field field : drawables) {
            try {
                if (!field.getName().equals("ic_launcher")) {
                    carIdsList.add(field.getInt(field.getName()));
                    carStringsList.add(formatCarFieldName(field.getName()));
                }
            } catch (Exception e) {
                e.printStackTrace();
            }
        }

        for (int i = 0; i < carStringsList.size(); i += 1) {
            carNamesList.put(carIdsList.get(i), carStringsList.get(i));
        }
    }


You may noticed this function formatCarFieldName(); I can use java function toUpperCase() but that will make all letters upper case. I don't want that, I wan only the first letter upper cased. Strings are immutable values so I make a concatenation trick like this one:

result = str.substring(0, 1).toUpperCase() + str.substring(1).toLowerCase();

which will upper case only the first letter. You can find this in the Utils class.

Some screen shots:


Tuesday, July 16, 2013

Washing Machines App with images

I managed to improve the application by adding images of the machines to the project.

The complete source code is on git hub https://github.com/bluePlayer/practices/tree/master/WashingMachines

- I added 6 images for each machine brand: LG, Samsung, BSH, Gorenje, Whirlpool and Videocon into the res/drawable-mdpi. You can add in other drawable folders for different screen resolutions but for this small application this is enough.

Note: Images and data for the washing machines are arbitrary and therefore not correct. 

In details.xml I added this ImageView component

<ImageView
        android:id="@+id/machine_image"
        android:layout_marginTop="10dp"
        android:layout_marginLeft="40dp"
        android:contentDescription="@string/machineImageDescrp"
        android:layout_width="230dp"
        android:layout_height="200dp"
        android:src="@drawable/bsh" />


Here it is:


- I added this line in strings.xml for the image view description attribute

<string name="machineImageDescrp">Current machine image</string>

- I dynamically change the image resource id for appropriate machine.

In DetailsActivity.java like this

this.machineImage = (ImageView) findViewById(R.id.machine_image);       this.machineImage.setImageResource(this.setImageId(this.brandName.getText().toString()));      
where setImageId() changes the image id according to the brand name

private int setImageId(String brandNameStr) {
        int result = 0;
        if (brandNameStr.equals(WMConstants.LG)) {
            result = R.drawable.lg;
        }
        if (brandNameStr.equals(WMConstants.SAMSUNG)) {
            result = R.drawable.samsung;
        }
        if (brandNameStr.equals(WMConstants.BSH)) {
            result = R.drawable.bsh;
        }
        if (brandNameStr.equals(WMConstants.WHIRLPOOL)) {
            result = R.drawable.whirlpool;
        }
        if (brandNameStr.equals(WMConstants.VIDEOCON)) {
            result = R.drawable.videocon;
        }
        if (brandNameStr.equals(WMConstants.GORENJE)) {
            result = R.drawable.gorenje;
        }
        return result;
    }


- Now you can see some new class called WMConstants. It is a new class I added for the project to keep track of all constants because using constants is much easier than remembering many strings. And also immune to errors.

Here it is

package com.example.washingmachines;
public class WMConstants {
    public static final String LG = "LG";
    public static final String SAMSUNG = "Samsung";
    public static final String BSH = "BSH";
    public static final String WHIRLPOOL = "Whirlpool";
    public static final String GORENJE = "Gorenje";
    public static final String VIDEOCON = "Videocon";

    public static final String FRONT_TYPE = "front";
    public static final String TOP_TYPE = "top";
    public static final String HYBRID_TYPE = "hybrid";

    public static final String MACHINE_TYPE = "type";
    public static final String MACHINE_BRAND_NAME = "brandName";
    public static final String MACHINE_WEIGHT = "weight";
    public static final String MACHINE_MAX_RPM = "maxRpm";
    public static final String MACHINE_WASH_TEMP = "washTemp";
    public static final String MACHINE_HAS_ENERGY_STAR = "hasEnergyStar";
    public static final String MACHINE_POWER_USAGE = "powerUsage";
}


- Most of the files used are same as in previous tutorials but you can use them all from git hub link above without no problems as it has the latest version of this application.

Here is Details.java


- MainActivity.java


Here are some resulting images:

list of machines

Gorenje Details

Videocon details

Whirlpool details

I have added sample images in the assets folder. You can use them for your project or you can use your own images. They should be 230x200 pixels

Monday, July 15, 2013

Washing mashines app in two activities

I managed to separate the list of machines and the details into separated activities.
All is the same as before except details are opened into new window.

The next part would be to add image to be shown along with the details of each washing machine.

Again the data used for the machines is arbitrary so it is not 100% correct. Just for practising purpose.

My strings.xml

<?xml version="1.0" encoding="utf-8"?>
<resources>

    <string name="app_name">WashingMachines</string>
    <string name="action_settings">Settings</string>
    <string name="machine_type">Machine type</string>
    <string name="brand_name">Brand name</string>
    <string name="weight">Weight</string>
    <string name="maxRpm">Max RPM</string>
    <string name="washTemp">Washing temperature</string>
    <string name="hasEnergyStar">Has energy star</string>
    <string name="powerUsage">Power usage</string>
    <string name="title_activity_details">MainActivity</string>
    <string name="main_list_btn">To the list</string>   
</resources>


activity_main.xml now has only list view component in linear layout for listing the available machines.

Here it is:

<LinearLayout xmlns:android="http://schemas.android.com/apk/res/android"
    xmlns:tools="http://schemas.android.com/tools"
    android:layout_width="match_parent"
    android:layout_height="match_parent"
    android:orientation="vertical"
    android:paddingBottom="@dimen/activity_vertical_margin"
    android:paddingLeft="@dimen/activity_horizontal_margin"
    android:paddingRight="@dimen/activity_horizontal_margin"
    android:paddingTop="@dimen/activity_vertical_margin"
    tools:context=".MainActivity" >

    <ListView
        android:id="@+id/scroll_view"
        android:layout_width="fill_parent"
        android:layout_height="fill_parent"
        android:orientation="vertical" >
    </ListView>

</LinearLayout>


A new layout is added for the DetailsActivity.java, details.xml.
<LinearLayout xmlns:android="http://schemas.android.com/apk/res/android"
    xmlns:tools="http://schemas.android.com/tools"
    android:layout_width="match_parent"
    android:layout_height="match_parent"
    android:orientation="vertical"
    android:paddingBottom="@dimen/activity_vertical_margin"
    android:paddingLeft="@dimen/activity_horizontal_margin"
    android:paddingRight="@dimen/activity_horizontal_margin"
    android:paddingTop="@dimen/activity_vertical_margin"
    tools:context=".DetailsActivity" >

            android:layout_width="fill_parent"
        android:layout_height="wrap_content"
        android:orientation="horizontal" >

                    android:layout_width="140dp"
            android:layout_height="wrap_content"
            android:layout_marginRight="5dp"
            android:text="@string/machine_type" />

                    android:id="@+id/machine_type_view"
            android:layout_width="fill_parent"
            android:layout_height="wrap_content"
            android:hint="@string/machine_type" />


            android:layout_width="fill_parent"
        android:layout_height="wrap_content"
        android:orientation="horizontal" >

                    android:layout_width="140dp"
            android:layout_height="wrap_content"
            android:layout_marginRight="5dp"
            android:text="@string/brand_name" />

                    android:id="@+id/brand_name_view"
            android:layout_width="fill_parent"
            android:layout_height="wrap_content"
            android:hint="@string/brand_name" />


            android:layout_width="fill_parent"
        android:layout_height="wrap_content"
        android:orientation="horizontal" >

                    android:layout_width="140dp"
            android:layout_height="wrap_content"
            android:layout_marginRight="5dp"
            android:text="@string/weight" />

                    android:id="@+id/weight_view"
            android:layout_width="fill_parent"
            android:layout_height="wrap_content"
            android:hint="@string/weight" />


            android:layout_width="fill_parent"
        android:layout_height="wrap_content"
        android:orientation="horizontal" >

                    android:layout_width="140dp"
            android:layout_height="wrap_content"
            android:layout_marginRight="5dp"
            android:text="@string/maxRpm" />

                    android:id="@+id/max_rpm_view"
            android:layout_width="fill_parent"
            android:layout_height="wrap_content"
            android:hint="@string/maxRpm" />


            android:layout_width="fill_parent"
        android:layout_height="wrap_content"
        android:orientation="horizontal" >

                    android:layout_width="140dp"
            android:layout_height="wrap_content"
            android:layout_marginRight="5dp"
            android:text="@string/washTemp" />

                    android:id="@+id/wash_temp_view"
            android:layout_width="fill_parent"
            android:layout_height="wrap_content"
            android:hint="@string/washTemp" />


            android:layout_width="fill_parent"
        android:layout_height="wrap_content"
        android:orientation="horizontal" >

                    android:layout_width="140dp"
            android:layout_height="wrap_content"
            android:layout_marginRight="5dp"
            android:text="@string/hasEnergyStar" />

                    android:id="@+id/has_energy_star_view"
            android:layout_width="fill_parent"
            android:layout_height="wrap_content"
            android:hint="@string/hasEnergyStar" />


            android:layout_width="fill_parent"
        android:layout_height="wrap_content"
        android:orientation="horizontal" >

                    android:layout_width="140dp"
            android:layout_height="wrap_content"
            android:layout_marginRight="5dp"
            android:text="@string/powerUsage" />

                    android:id="@+id/power_usage_view"
            android:layout_width="fill_parent"
            android:layout_height="wrap_content"
            android:hint="@string/powerUsage" />


           android:id="@+id/main_list_btn"
        android:layout_width="wrap_content"
        android:layout_height="wrap_content"
        android:text="@string/main_list_btn" />


It contains all the text fields for showing data about clicked machine from the main list. I used the wizard to add new android activity and it created details.xml layout file automatically.

Right click on your project node in Projects Tab -> New -> Other -> Android Activity

Name you new activity as you like I named it DetailsActivity and details.xml

Now about java classes.

WashingMachine.java stays the same as in previous post.

MainActivity.java look like this:

package com.example.washingmachines;

import java.util.ArrayList;
import java.util.List;

import android.os.Bundle;
import android.app.Activity;
import android.content.Intent;
import android.view.Menu;
import android.view.View;
import android.widget.AdapterView;
import android.widget.AdapterView.OnItemClickListener;
import android.widget.ArrayAdapter;
import android.widget.ListView;

public class MainActivity extends Activity {

    private ListView machines = null;
    private List listOfMachines = new ArrayList();
    private ArrayAdapter adapter = null;
    private List machinesList = new ArrayList();
   
   
    @Override
    protected void onCreate(Bundle savedInstanceState) {
        super.onCreate(savedInstanceState);
        setContentView(R.layout.activity_main);

        initView();
    }

    private void initView() {

        this.machines = (ListView) findViewById(R.id.scroll_view);

        WashingMachine wm1 = new WashingMachine("front", "LG", 65, 1200, 41,
                false, 100);
        this.listOfMachines.add(wm1);

        WashingMachine wm2 = new WashingMachine("top", "Samsung", 73, 800, 60,
                false, 90);
        this.listOfMachines.add(wm2);

        WashingMachine wm3 = new WashingMachine("hybrid", "BSH", 52, 1650, 36,
                true, 70);
        this.listOfMachines.add(wm3);

        WashingMachine wm4 = new WashingMachine("top", "Whirlpool", 105, 1400,
                56, false, 150);
        this.listOfMachines.add(wm4);

        WashingMachine wm5 = new WashingMachine("front", "Gorenje", 360, 2000,
                70, false, 300);
        this.listOfMachines.add(wm5);

        WashingMachine wm6 = new WashingMachine("hybrid", "Videocon", 300,
                2000, 85, false, 310);
        this.listOfMachines.add(wm6);

        this.machinesList.add(this.listOfMachines.get(0).getBrandName());
        this.machinesList.add(this.listOfMachines.get(1).getBrandName());
        this.machinesList.add(this.listOfMachines.get(2).getBrandName());
        this.machinesList.add(this.listOfMachines.get(3).getBrandName());
        this.machinesList.add(this.listOfMachines.get(4).getBrandName());
        this.machinesList.add(this.listOfMachines.get(5).getBrandName());

        this.adapter = new ArrayAdapter(this,
                android.R.layout.simple_list_item_1, this.machinesList);
        this.machines.setAdapter(adapter);

        this.machines.setOnItemClickListener(new OnItemClickListener() {
            @Override
            public void onItemClick(AdapterView arg0, View arg1, int arg2,
                    long arg3) {
                Intent k = new Intent(MainActivity.this, DetailsActivity.class);
                k.putExtra("type", listOfMachines.get(arg2).getType());
                k.putExtra("brandName", listOfMachines.get(arg2).getBrandName());
                k.putExtra("weight", listOfMachines.get(arg2).getWeight());
                k.putExtra("maxRpm", listOfMachines.get(arg2).getMaxRpm());
                k.putExtra("washTemp", listOfMachines.get(arg2).getWashTemp());
                k.putExtra("hasEnergyStar", listOfMachines.get(arg2).isHasEnergyStar());
                k.putExtra("powerUsage", listOfMachines.get(arg2).getPowerUsage());
                startActivity(k);

            }
        });

    }

    @Override
    public boolean onCreateOptionsMenu(Menu menu) {
        // Inflate the menu; this adds items to the action bar if it is present.
        getMenuInflater().inflate(R.menu.main, menu);
        return true;
    }

}


I create new Intent that launches DetailsActivity and put data from the clicked machine into the new intent using putExtra() method. Than I start the new activity

Intent k = new Intent(MainActivity.this, DetailsActivity.class);

k.putExtra("type", listOfMachines.get(arg2).getType());
                

k.putExtra("brandName", listOfMachines.get(arg2).getBrandName());
                

k.putExtra("weight", listOfMachines.get(arg2).getWeight());
               

 k.putExtra("maxRpm", listOfMachines.get(arg2).getMaxRpm());
               

 k.putExtra("washTemp", listOfMachines.get(arg2).getWashTemp());
                

k.putExtra("hasEnergyStar", listOfMachines.get(arg2).isHasEnergyStar());
                

k.putExtra("powerUsage", listOfMachines.get(arg2).getPowerUsage());
                

startActivity(k);

arg2 is the index of the clicked item in the list view.

Now the last class is DetailsActivity.java which read the extra data sent to it and fills the text views that reside inside it.

package com.example.washingmachines;

import java.util.ArrayList;
import java.util.List;

import android.os.Bundle;
import android.app.Activity;
import android.view.Menu;
import android.view.View;
import android.view.View.OnClickListener;
import android.widget.Button;
import android.widget.TextView;

public class DetailsActivity extends Activity {

    private TextView type = null;
    private TextView brandName = null;
    private TextView weight = null;
    private TextView maxRmp = null;
    private TextView washTemp = null;
    private TextView hasEnergyStar = null;
    private TextView powerUsage = null;
    private Button mainListBtn = null;
   
    @Override
    protected void onCreate(Bundle savedInstanceState) {
        super.onCreate(savedInstanceState);
        setContentView(R.layout.details);
      
        this.type = (TextView) findViewById(R.id.machine_type_view);
        this.brandName = (TextView) findViewById(R.id.brand_name_view);
        this.weight = (TextView) findViewById(R.id.weight_view);
        this.maxRmp = (TextView) findViewById(R.id.max_rpm_view);
        this.washTemp = (TextView) findViewById(R.id.wash_temp_view);
        this.hasEnergyStar = (TextView) findViewById(R.id.has_energy_star_view);
        this.powerUsage = (TextView) findViewById(R.id.power_usage_view);
      
        String typeValue = getIntent().getStringExtra("type");
        this.type.setText(typeValue);
      
        String brandNameValue  = getIntent().getStringExtra("brandName");
        this.brandName.setText(brandNameValue);
      
        String weightValue  = getIntent().getStringExtra("weight");
        this.weight.setText(weightValue);
      
        String maxRpmValue  = getIntent().getStringExtra("maxRpm");
        maxRmp.setText(maxRpmValue);
      
        String washTempValue  = getIntent().getStringExtra("washTemp");
        washTemp.setText(washTempValue);
      
        String hasEnergyStarValue = getIntent().getBooleanExtra("hasEnergyStar", false) ? "yes" : "no";
        hasEnergyStar.setText(hasEnergyStarValue);
      
        String powerUsageValue  = getIntent().getStringExtra("powerUsage");
        powerUsage.setText(powerUsageValue);
      
        this.mainListBtn = (Button) findViewById(R.id.main_list_btn);
        this.mainListBtn.setOnClickListener(new OnClickListener() {
          
            @Override
            public void onClick(View arg0) {
                finish();
            }
        });
    }

    @Override
    public boolean onCreateOptionsMenu(Menu menu) {
        // Inflate the menu; this adds items to the action bar if it is present.
        getMenuInflater().inflate(R.menu.details, menu);
        return true;
    }

}


I read the extra data using getString/getInt/getBoolean etc... methods inside the intent returned by getIntent() method.

Example:

String powerUsageValue  = getIntent().getStringExtra("powerUsage");
powerUsage.setText(powerUsageValue);

Now the next question is how do I return back to the list. I added a button for this in the details.xml layout file. And I use finish() method to close and destroy the instance of the current activity. Afterwards the focus is returned to the MainActivity of the application.


 this.mainListBtn = (Button) findViewById(R.id.main_list_btn);
        this.mainListBtn.setOnClickListener(new OnClickListener() {
          
            @Override
            public void onClick(View arg0) {
                finish();
            }
        });


Result images:


machines list

machine details

Friday, July 12, 2013

ScrollView practice screenshots

Here are the screenshots I got while developing

Settings
Starting up

In the middle, only first row of colors functions

Final look

ScrollView practice

I have recently developed a small application that make use of ScrollView and HorizontallScrollView in Android.

It is an application that has 8 colored buttons using RGB + white and CMYK color schemes and when clicked they create text view instance colored with appropriate color, all added to one ScrollView and HorizontallScrollView.

I needed to edit the strings.xml so I did this:

<?xml version="1.0" encoding="utf-8"?>
<resources>

    <string name="app_name">MySecondSVAndroidApp</string>
    <string name="action_settings">Settings</string>
    <string name="hello_world">Hello world!</string>
    <string name="click_me">Click me!</string>

    <color name="red">#FF0000</color>
    <color name="green">#008000</color>
    <color name="blue">#0000FF</color>
    <color name="black">#000000</color>
    <color name="cyan">#00FFFF</color>
    <color name="magenta">#FF00FF</color>
    <color name="yellow">#FFFF00</color>
    <color name="white">#FFFFFF</color>
</resources>


I added colors to be used on the buttons.

Here is my activity_main.xml

<LinearLayout xmlns:android="http://schemas.android.com/apk/res/android"
    xmlns:tools="http://schemas.android.com/tools"
    android:layout_width="match_parent"
    android:layout_height="match_parent"
    android:orientation="vertical"
    android:paddingBottom="@dimen/activity_vertical_margin"
    android:paddingLeft="@dimen/activity_horizontal_margin"
    android:paddingRight="@dimen/activity_horizontal_margin"
    android:paddingTop="@dimen/activity_vertical_margin"
    tools:context=".MainActivity" >

    <LinearLayout
        android:layout_width="match_parent"
        android:layout_height="60dp"
        android:orientation="horizontal" >

        <LinearLayout
            android:layout_width="60dp"
            android:layout_height="60dp"
            android:background="@color/black" >

            <Button
                android:id="@+id/red_btn"
                android:layout_width="58dp"
                android:layout_height="58dp"
                android:layout_marginLeft="1dp"
                android:layout_marginTop="1dp"
                android:background="@color/red"
                android:text="@string/click_me"/>
        </LinearLayout>

        <LinearLayout
            android:layout_width="60dp"
            android:layout_height="60dp"
            android:background="@color/black" >

            <Button
                android:id="@+id/green_btn"
                android:layout_width="58dp"
                android:layout_height="58dp"
                android:layout_marginLeft="1dp"
                android:layout_marginTop="1dp"
                android:background="@color/green"
                android:text="@string/click_me"/>
        </LinearLayout>

        <LinearLayout
            android:layout_width="60dp"
            android:layout_height="60dp"
            android:background="@color/black" >

            <Button
                android:id="@+id/blue_btn"
                android:layout_width="58dp"
                android:layout_height="58dp"
                android:layout_marginLeft="1dp"
                android:layout_marginTop="1dp"
                android:background="@color/blue"
                android:text="@string/click_me"/>
        </LinearLayout>

        <LinearLayout
            android:layout_width="60dp"
            android:layout_height="60dp"
            android:background="@color/black" >

            <Button
                android:id="@+id/white_btn"
                android:layout_width="58dp"
                android:layout_height="58dp"
                android:layout_marginLeft="1dp"
                android:layout_marginTop="1dp"
                android:background="@color/white"
                android:text="@string/click_me"/>
        </LinearLayout>
    </LinearLayout>

    <LinearLayout
        android:layout_width="match_parent"
        android:layout_height="60dp"
        android:orientation="horizontal" >

        <LinearLayout
            android:layout_width="60dp"
            android:layout_height="60dp"
            android:background="@color/black" >

            <Button
                android:id="@+id/cyan_btn"
                android:layout_width="58dp"
                android:layout_height="58dp"
                android:layout_marginLeft="1dp"
                android:layout_marginTop="1dp"
                android:background="@color/cyan"
                android:text="@string/click_me"/>
        </LinearLayout>

        <LinearLayout
            android:layout_width="60dp"
            android:layout_height="60dp"
            android:background="@color/black" >

            <Button
                android:id="@+id/magenta_btn"
                android:layout_width="58dp"
                android:layout_height="58dp"
                android:layout_marginLeft="1dp"
                android:layout_marginTop="1dp"
                android:background="@color/magenta"
                android:text="@string/click_me"/>
        </LinearLayout>

        <LinearLayout
            android:layout_width="60dp"
            android:layout_height="60dp"
            android:background="@color/black" >

            <Button
                android:id="@+id/yellow_btn"
                android:layout_width="58dp"
                android:layout_height="58dp"
                android:layout_marginLeft="1dp"
                android:layout_marginTop="1dp"
                android:background="@color/yellow"
                android:text="@string/click_me"/>
        </LinearLayout>

        <LinearLayout
            android:layout_width="60dp"
            android:layout_height="60dp"
            android:background="@color/black" >

            <Button
                android:id="@+id/black_btn"
                android:layout_width="58dp"
                android:layout_height="58dp"
                android:layout_marginLeft="1dp"
                android:layout_marginTop="1dp"
                android:background="@color/black"
                android:textColor="#ffffff"
                android:text="@string/click_me"/>
        </LinearLayout>
    </LinearLayout>

    <ScrollView
        android:layout_width="fill_parent"
        android:layout_height="150dp"
        android:layout_marginTop="5dp"
        android:layout_marginBottom="5dp">

        <LinearLayout
            android:id="@+id/scroll_vertical"
            android:layout_width="fill_parent"
            android:layout_height="wrap_content"
            android:gravity="center_horizontal"
            android:orientation="vertical" >
        </LinearLayout>
    </ScrollView>

    <HorizontalScrollView
        android:layout_width="fill_parent"
        android:layout_height="fill_parent" >

        <LinearLayout
            android:id="@+id/scroll_horizontal"
            android:layout_width="wrap_content"
            android:layout_height="fill_parent"
            android:gravity="center_vertical"
            android:orientation="horizontal" >
        </LinearLayout>
    </HorizontalScrollView>

</LinearLayout>


This look something like this:


 I Started to code but I found that many things are repetitive and also MainActivity.java would get very big and clumsy so I separated all things that can be separated. I added two more classes:

ColorButton - class that holds data and structure about each of the buttons shown on upper image.
ColorButtonTextView - class that holds data and formatting about newly created text view which is added to the vertical and horizontal scrollviews.

Note: I am adding text view object to LinearLayout objects inside ScrollView and HorizontallScrollView. I don't edit them directly.

Here are the classes

ColorButtonTextView

package com.example.mysecondsvandroidapp;

import android.content.Context;
import android.util.AttributeSet;
import android.widget.TextView;
import android.widget.LinearLayout.LayoutParams;

public class ColorButtonTextView extends TextView{

    private LayoutParams textViewParams = null;
   
    public ColorButtonTextView(Context context, AttributeSet attrs, int defStyle) {
        super(context, attrs, defStyle);
        // TODO Auto-generated constructor stub
    }

    public ColorButtonTextView(Context context, AttributeSet attrs) {
        super(context, attrs);
        // TODO Auto-generated constructor stub
    }

    public ColorButtonTextView(Context context) {
        super(context);
        this.textViewParams = new LayoutParams(100, 100);
        this.textViewParams.setMargins(2, 2, 2, 2);
        this.setLayoutParams(textViewParams);
        this.setWidth(100);
        this.setHeight(100);
    }

}


ColorButton

package com.example.mysecondsvandroidapp;

import android.graphics.Color;
import android.view.View;
import android.view.View.OnClickListener;
import android.widget.Button;
import android.widget.LinearLayout;
import android.widget.TextView;
import android.widget.LinearLayout.LayoutParams;


public class ColorButton {

    private String textStr;
    private int buttonColor;
    private Button button = null;
    private ColorButtonTextView textView = null;
    private ColorButtonTextView textView1 = null;
    private LinearLayout vertical;
    private LinearLayout horizontal;
   
    public ColorButton(Button button, String text, int color, LinearLayout v, LinearLayout h) {
        super();
        this.textStr = text;
        this.buttonColor = color;
        this.vertical = v;
        this.horizontal = h;
       
        this.button = button;
        this.button.setOnClickListener(new OnClickListener() {
           
            @Override
            public void onClick(View v) {
                textView = new ColorButtonTextView(v.getContext());
                textView.setText(textStr);
                textView.setBackgroundColor(buttonColor);
                vertical.addView(textView);
               
                textView1 = new ColorButtonTextView(v.getContext());
                textView1.setText(textStr);
                textView1.setBackgroundColor(buttonColor);
                horizontal.addView(textView1);
               
                if(buttonColor == Color.BLACK)
                {
                    textView.setTextColor(Color.WHITE);
                    textView1.setTextColor(Color.WHITE);
                }
                else
                {
                    textView.setTextColor(Color.BLACK);
                    textView1.setTextColor(Color.BLACK);
                }
            }
        });
       
    }
   
}


Note: You cannot use same text view instance to be added in both Vertical and Horizontall scroll views aka linear layouts. It will give an error after running the application. So thats why I create two separate instances:  textView and textView1.

MainActivity.java

package com.example.mysecondsvandroidapp;

import android.os.Bundle;
import android.app.Activity;
import android.graphics.Color;
import android.view.Menu;
import android.widget.Button;
import android.widget.LinearLayout;

public class MainActivity extends Activity {

    private ColorButton redButton = null;
    private ColorButton greenButton = null;
    private ColorButton blueButton = null;
    private ColorButton whiteButton = null;
    private ColorButton cyanButton = null;
    private ColorButton magentaButton = null;
    private ColorButton yellowButton = null;
    private ColorButton blackButton = null;
    private LinearLayout scrollVertical = null;
    private LinearLayout scrollHorizontal = null;

    @Override
    protected void onCreate(Bundle savedInstanceState) {
        super.onCreate(savedInstanceState);
        setContentView(R.layout.activity_main);

        initView();
    }

    private void initView() {
       
        this.scrollVertical = (LinearLayout) findViewById(R.id.scroll_vertical);
        this.scrollHorizontal = (LinearLayout) findViewById(R.id.scroll_horizontal);
       
        Button redBtn = (Button) findViewById(R.id.red_btn);
        this.redButton = new ColorButton(redBtn, "Red Color", Color.RED, scrollVertical, scrollHorizontal);
       
        Button greenBtn = (Button) findViewById(R.id.green_btn);
        this.greenButton = new ColorButton(greenBtn, "Green Color", Color.GREEN, scrollVertical, scrollHorizontal);
       
        Button blueBtn = (Button) findViewById(R.id.blue_btn);
        this.blueButton = new ColorButton(blueBtn, "Blue Color", Color.BLUE, scrollVertical, scrollHorizontal);
       
        Button whiteBtn = (Button) findViewById(R.id.white_btn);
        this.whiteButton = new ColorButton(whiteBtn, "White Color", Color.WHITE, scrollVertical, scrollHorizontal);
       
        Button cyanBtn = (Button) findViewById(R.id.cyan_btn);
        this.cyanButton = new ColorButton(cyanBtn, "Cyan Color", Color.CYAN, scrollVertical, scrollHorizontal);
       
        Button magentaBtn = (Button) findViewById(R.id.magenta_btn);
        this.magentaButton = new ColorButton(magentaBtn, "Magenta Color", Color.MAGENTA, scrollVertical, scrollHorizontal);
       
        Button yellowBtn = (Button) findViewById(R.id.yellow_btn);
        this.yellowButton = new ColorButton(yellowBtn, "Yellow Color", Color.YELLOW, scrollVertical, scrollHorizontal);
       
        Button blackBtn = (Button) findViewById(R.id.black_btn);
        this.blackButton = new ColorButton(blackBtn, "Black Color", Color.BLACK, scrollVertical, scrollHorizontal);
    }

    @Override
    public boolean onCreateOptionsMenu(Menu menu) {
        // Inflate the menu; this adds items to the action bar if it is present.
        getMenuInflater().inflate(R.menu.main, menu);
        return true;
    }

}


Be sure to run this application. I tested it on Nexus S - 4.0" - WVGA (480x800 hdpi)
Clicking on each button creates new text view in the scroll views at the same time. You can scroll them vertically and horizontally.


You can find the code on git hub here: https://github.com/bluePlayer/practices/tree/master/MySecondSVAndroidApp

Monday, July 8, 2013

ListView Practice

In this post I will show you what I did practicing with ListView in Android.

Here is my activity_main.xml

<LinearLayout xmlns:android="http://schemas.android.com/apk/res/android"
    xmlns:tools="http://schemas.android.com/tools"
    android:layout_width="match_parent"
    android:layout_height="match_parent"
    android:paddingBottom="@dimen/activity_vertical_margin"
    android:paddingLeft="@dimen/activity_horizontal_margin"
    android:paddingRight="@dimen/activity_horizontal_margin"
    android:paddingTop="@dimen/activity_vertical_margin"
    tools:context=".MainActivity"
    android:orientation="vertical">

    <LinearLayout
        android:layout_width="match_parent"
        android:layout_height="wrap_content"
        android:orientation="horizontal">
        <EditText
            android:id="@+id/category_edit"
            android:layout_height="wrap_content"
            android:layout_width="250dp"
            android:text="@string/edit_category"
            android:inputType="text"/>
    </LinearLayout>
    <LinearLayout
        android:layout_width="match_parent"
        android:layout_height="wrap_content"
        android:orientation="horizontal">
        <EditText
            android:id="@+id/product_edit"
            android:layout_width="250dp"
            android:layout_height="wrap_content"
            android:text="@string/edit_product"
            android:inputType="text"/>
    </LinearLayout>
    <LinearLayout
        android:layout_width="match_parent"
        android:layout_height="wrap_content"
        android:orientation="horizontal">
        <Button
            android:id="@+id/add_product_btn"
            android:layout_width="wrap_content"
            android:layout_height="wrap_content"
            android:text="@string/add_product_btn"/>
        <Button
            android:id="@+id/update_product_btn"
            android:layout_width="wrap_content"
            android:layout_height="wrap_content"
            android:text="@string/update_product_btn"/>
        <Button
            android:id="@+id/delete_product_btn"
            android:layout_width="wrap_content"
            android:layout_height="wrap_content"
            android:text="@string/delete_product_btn"/>
    </LinearLayout>
    <ListView android:id="@+id/products_view"
            android:layout_width="wrap_content"
            android:layout_height="wrap_content"
            />
</LinearLayout>

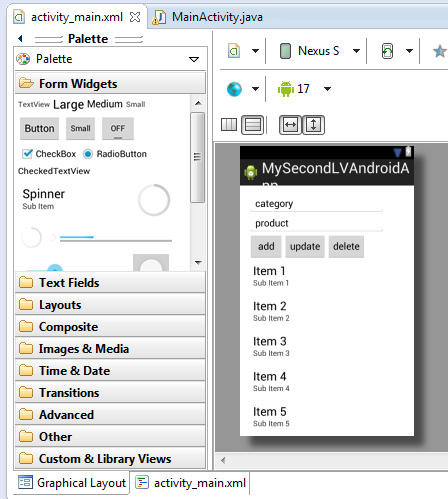
It looks like this:

Basically I have two edit text fields. In the first I edit product category and in the second I edit the product name. When I press add new item is added in the list view below. I keep track of current list item with integer index number and I increment or decrement it when adding or deleting item from the list. I added simple validation for the input data. I guess it is not enough but it will do good for this post. I used something like this for validation:

 Toast.makeText(v.getContext(), "Error message", Toast.LENGTH_LONG).show();

Here is my code:

package com.example.mysecondlvandroidapp;

import java.util.ArrayList;
import java.util.List;
import android.os.Bundle;
import android.app.Activity;
import android.view.Menu;
import android.view.View;
import android.view.View.OnClickListener;
import android.widget.AdapterView.OnItemClickListener;
import android.widget.AdapterView;
import android.widget.ArrayAdapter;
import android.widget.Button;
import android.widget.EditText;
import android.widget.ListView;
import android.widget.Toast;

public class MainActivity extends Activity {

    private int currentProductIndex = -1;
    private List<String> productsList = new ArrayList<String>();
    private EditText categoryEdit = null;
    private EditText productEdit = null;
    private Button addProductBtn = null;
    private Button updateProductBtn = null;
    private Button deleteProductBtn = null;

    private ArrayAdapter<String> adapter = null;
    private ListView productsView = null;

    @Override
    protected void onCreate(Bundle savedInstanceState) {
        super.onCreate(savedInstanceState);
        setContentView(R.layout.activity_main);

        initView();
    }

    private void initView() {

        this.categoryEdit = (EditText) findViewById(R.id.category_edit);
        this.productEdit = (EditText) findViewById(R.id.product_edit);

        this.addProductBtn = (Button) findViewById(R.id.add_product_btn);
        this.addProductBtn.setOnClickListener(new OnClickListener() {

            @Override
            public void onClick(View v) {

                String categoryStr = categoryEdit.getText().toString();
                if (categoryStr.equals("category")) {
                    Toast.makeText(v.getContext(), "Edit category!",
                            Toast.LENGTH_LONG).show();
                } else {

                    String productStr = productEdit.getText().toString();
                    if (productStr.equals("product")) {
                        Toast.makeText(v.getContext(), "Edit product!",
                                Toast.LENGTH_LONG).show();
                    } else {
                        String listViewItem = categoryStr + " - " + productStr;
                        currentProductIndex += 1;
                        adapter.add(listViewItem);
                       
                    }
                }

            }
        });

        this.updateProductBtn = (Button) findViewById(R.id.update_product_btn);
        this.updateProductBtn.setOnClickListener(new OnClickListener() {

            @Override
            public void onClick(View v) {
                if (currentProductIndex > -1) {
                    String categoryStr = categoryEdit.getText().toString();
                    String productStr = productEdit.getText().toString();
                    String listViewItem = categoryStr + " - " + productStr;
                    productsList.set(currentProductIndex, listViewItem);
                    runOnUiThread(new Runnable() {
                        @Override
                        public void run() {
                                adapter.notifyDataSetChanged();
                        }
                       
                    });
                } else {
                    Toast.makeText(v.getContext(), "List is empty!",
                            Toast.LENGTH_LONG).show();
                }

            }
        });

        this.deleteProductBtn = (Button) findViewById(R.id.delete_product_btn);
        this.deleteProductBtn.setOnClickListener(new OnClickListener() {

            @Override
            public void onClick(View v) {
                if (currentProductIndex > -1) {
                    productsList.remove(currentProductIndex);
                    currentProductIndex -= 1;
                    runOnUiThread(new Runnable() {
                        @Override
                        public void run() {
                                adapter.notifyDataSetChanged();
                        }
                       
                    });
                } else {
                    Toast.makeText(v.getContext(), "List is empty!",
                            Toast.LENGTH_LONG).show();
                }

            }
        });

        this.adapter = new ArrayAdapter<String>(this,
                android.R.layout.simple_list_item_1, productsList);
       
        this.productsView = (ListView) findViewById(R.id.products_view);
        this.productsView.setAdapter(adapter);
        this.productsView.setOnItemClickListener(new OnItemClickListener() {
            @Override
            public void onItemClick(AdapterView<?> arg0, View arg1, int arg2,
                    long arg3) {
                Toast.makeText(arg1.getContext(), productsList.get(arg2),
                        Toast.LENGTH_SHORT).show();

            }
        });
    }

    @Override
    public boolean onCreateOptionsMenu(Menu menu) {
        // Inflate the menu; this adds items to the action bar if it is present.
        getMenuInflater().inflate(R.menu.main, menu);
        return true;
    }

}


I run this function:

      runOnUiThread(new Runnable() {
                  @Override
                   public void run() {
                         adapter.notifyDataSetChanged();
                   }
                       
      });

after updating or deleting to update the ListView with new changes. I guess there is a better way to do this but for now I think it is ok.

Here are some of the screen shots I made developing this small application.


There was an extra button for category. I removed it.

Add product functionality.

update and delete functionality

Test on Nexus 7 AVD