Showing posts with label nexus7. Show all posts

Thursday, July 25, 2013

Simple Gallery App in Android

I have recently worked on a simple Gallery application in Android.

It has one ImageView component, two buttons, previous and next and one TextView for description. It is a gallery application for European cars. Actually I have 27 car brands and one model (image) for each brand. I added 27 images which are all 640 x 480 pixels (You can download images from Google) into CarTestApp/res/drawable-mdpi folder.

I was testing my app on Nexus 7 AVD emmulator.

Here is how you application should look like.


I will show you some tricks I used in this small app, like how to access all drawable objects.

Ok so here is my layout file:


My strings.xml file

<?xml version="1.0" encoding="utf-8"?>
<resources>

    <string name="app_name">CartTestApp</string>
    <string name="action_settings">Settings</string>
    <string name="hello_world">Hello world!</string>
    <string name="image_view">Image description</string>
    <string name="prev_btn">prev</string>
    <string name="next_btn">next</string>
    <string name="car_name_text_view">Car Name</string>
</resources>


I added Utils.java file for a helper function. It is only one function but I guess I will expand the application future.

Utils.java:

package com.testpkg.carttestapp;

public class Utils {
    public static String formatFirstLetterOfString(String str) {
        String result = "";

        result = str.substring(0, 1).toUpperCase()
                + str.substring(1).toLowerCase();

        return result;
    }
}


Next class I added is called CarNames.java. It has many static functions so that I don't need to instantiate an object of this class. No need to.

Here it is:


Check these lines:

public static Field[] nativeDrawables = android.R.drawable.class
            .getFields();

public static Field[] drawables = com.testpkg.carttestapp.R.drawable.class
            .getFields();


Function getFields() returns the fields in a given resource from our application.

For example android.R.drawable contains native android drawable resources while com.testpkg.cartestapp.R.drawable contains drawable resources that we have added to our application.

So actually we can search our resources with code.

I have two ArrayList objects, one for drawable ids and one for drawable string names. I also have a hash map with drawable id as a key and car string name as a value.

Here is the reset() function in which I fill my lists and the hash map:

public static void reset() {

     for (Field field : drawables) {
            try {
                if (!field.getName().equals("ic_launcher")) {
                    carIdsList.add(field.getInt(field.getName()));
                    carStringsList.add(formatCarFieldName(field.getName()));
                }
            } catch (Exception e) {
                e.printStackTrace();
            }
        }

        for (int i = 0; i < carStringsList.size(); i += 1) {
            carNamesList.put(carIdsList.get(i), carStringsList.get(i));
        }
    }


You may noticed this function formatCarFieldName(); I can use java function toUpperCase() but that will make all letters upper case. I don't want that, I wan only the first letter upper cased. Strings are immutable values so I make a concatenation trick like this one:

result = str.substring(0, 1).toUpperCase() + str.substring(1).toLowerCase();

which will upper case only the first letter. You can find this in the Utils class.

Some screen shots:


Monday, July 8, 2013

ListView Practice

In this post I will show you what I did practicing with ListView in Android.

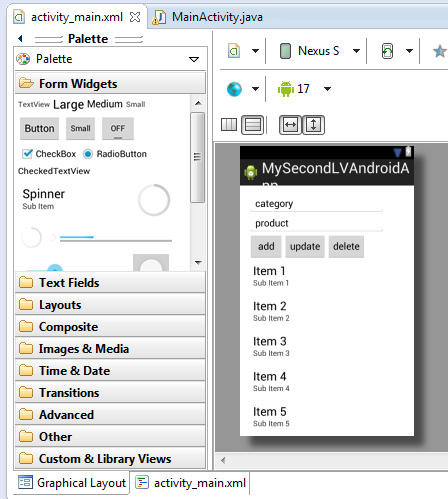
Here is my activity_main.xml

<LinearLayout xmlns:android="http://schemas.android.com/apk/res/android"
    xmlns:tools="http://schemas.android.com/tools"
    android:layout_width="match_parent"
    android:layout_height="match_parent"
    android:paddingBottom="@dimen/activity_vertical_margin"
    android:paddingLeft="@dimen/activity_horizontal_margin"
    android:paddingRight="@dimen/activity_horizontal_margin"
    android:paddingTop="@dimen/activity_vertical_margin"
    tools:context=".MainActivity"
    android:orientation="vertical">

    <LinearLayout
        android:layout_width="match_parent"
        android:layout_height="wrap_content"
        android:orientation="horizontal">
        <EditText
            android:id="@+id/category_edit"
            android:layout_height="wrap_content"
            android:layout_width="250dp"
            android:text="@string/edit_category"
            android:inputType="text"/>
    </LinearLayout>
    <LinearLayout
        android:layout_width="match_parent"
        android:layout_height="wrap_content"
        android:orientation="horizontal">
        <EditText
            android:id="@+id/product_edit"
            android:layout_width="250dp"
            android:layout_height="wrap_content"
            android:text="@string/edit_product"
            android:inputType="text"/>
    </LinearLayout>
    <LinearLayout
        android:layout_width="match_parent"
        android:layout_height="wrap_content"
        android:orientation="horizontal">
        <Button
            android:id="@+id/add_product_btn"
            android:layout_width="wrap_content"
            android:layout_height="wrap_content"
            android:text="@string/add_product_btn"/>
        <Button
            android:id="@+id/update_product_btn"
            android:layout_width="wrap_content"
            android:layout_height="wrap_content"
            android:text="@string/update_product_btn"/>
        <Button
            android:id="@+id/delete_product_btn"
            android:layout_width="wrap_content"
            android:layout_height="wrap_content"
            android:text="@string/delete_product_btn"/>
    </LinearLayout>
    <ListView android:id="@+id/products_view"
            android:layout_width="wrap_content"
            android:layout_height="wrap_content"
            />
</LinearLayout>

It looks like this:

Basically I have two edit text fields. In the first I edit product category and in the second I edit the product name. When I press add new item is added in the list view below. I keep track of current list item with integer index number and I increment or decrement it when adding or deleting item from the list. I added simple validation for the input data. I guess it is not enough but it will do good for this post. I used something like this for validation:

 Toast.makeText(v.getContext(), "Error message", Toast.LENGTH_LONG).show();

Here is my code:

package com.example.mysecondlvandroidapp;

import java.util.ArrayList;
import java.util.List;
import android.os.Bundle;
import android.app.Activity;
import android.view.Menu;
import android.view.View;
import android.view.View.OnClickListener;
import android.widget.AdapterView.OnItemClickListener;
import android.widget.AdapterView;
import android.widget.ArrayAdapter;
import android.widget.Button;
import android.widget.EditText;
import android.widget.ListView;
import android.widget.Toast;

public class MainActivity extends Activity {

    private int currentProductIndex = -1;
    private List<String> productsList = new ArrayList<String>();
    private EditText categoryEdit = null;
    private EditText productEdit = null;
    private Button addProductBtn = null;
    private Button updateProductBtn = null;
    private Button deleteProductBtn = null;

    private ArrayAdapter<String> adapter = null;
    private ListView productsView = null;

    @Override
    protected void onCreate(Bundle savedInstanceState) {
        super.onCreate(savedInstanceState);
        setContentView(R.layout.activity_main);

        initView();
    }

    private void initView() {

        this.categoryEdit = (EditText) findViewById(R.id.category_edit);
        this.productEdit = (EditText) findViewById(R.id.product_edit);

        this.addProductBtn = (Button) findViewById(R.id.add_product_btn);
        this.addProductBtn.setOnClickListener(new OnClickListener() {

            @Override
            public void onClick(View v) {

                String categoryStr = categoryEdit.getText().toString();
                if (categoryStr.equals("category")) {
                    Toast.makeText(v.getContext(), "Edit category!",
                            Toast.LENGTH_LONG).show();
                } else {

                    String productStr = productEdit.getText().toString();
                    if (productStr.equals("product")) {
                        Toast.makeText(v.getContext(), "Edit product!",
                                Toast.LENGTH_LONG).show();
                    } else {
                        String listViewItem = categoryStr + " - " + productStr;
                        currentProductIndex += 1;
                        adapter.add(listViewItem);
                       
                    }
                }

            }
        });

        this.updateProductBtn = (Button) findViewById(R.id.update_product_btn);
        this.updateProductBtn.setOnClickListener(new OnClickListener() {

            @Override
            public void onClick(View v) {
                if (currentProductIndex > -1) {
                    String categoryStr = categoryEdit.getText().toString();
                    String productStr = productEdit.getText().toString();
                    String listViewItem = categoryStr + " - " + productStr;
                    productsList.set(currentProductIndex, listViewItem);
                    runOnUiThread(new Runnable() {
                        @Override
                        public void run() {
                                adapter.notifyDataSetChanged();
                        }
                       
                    });
                } else {
                    Toast.makeText(v.getContext(), "List is empty!",
                            Toast.LENGTH_LONG).show();
                }

            }
        });

        this.deleteProductBtn = (Button) findViewById(R.id.delete_product_btn);
        this.deleteProductBtn.setOnClickListener(new OnClickListener() {

            @Override
            public void onClick(View v) {
                if (currentProductIndex > -1) {
                    productsList.remove(currentProductIndex);
                    currentProductIndex -= 1;
                    runOnUiThread(new Runnable() {
                        @Override
                        public void run() {
                                adapter.notifyDataSetChanged();
                        }
                       
                    });
                } else {
                    Toast.makeText(v.getContext(), "List is empty!",
                            Toast.LENGTH_LONG).show();
                }

            }
        });

        this.adapter = new ArrayAdapter<String>(this,
                android.R.layout.simple_list_item_1, productsList);
       
        this.productsView = (ListView) findViewById(R.id.products_view);
        this.productsView.setAdapter(adapter);
        this.productsView.setOnItemClickListener(new OnItemClickListener() {
            @Override
            public void onItemClick(AdapterView<?> arg0, View arg1, int arg2,
                    long arg3) {
                Toast.makeText(arg1.getContext(), productsList.get(arg2),
                        Toast.LENGTH_SHORT).show();

            }
        });
    }

    @Override
    public boolean onCreateOptionsMenu(Menu menu) {
        // Inflate the menu; this adds items to the action bar if it is present.
        getMenuInflater().inflate(R.menu.main, menu);
        return true;
    }

}


I run this function:

      runOnUiThread(new Runnable() {
                  @Override
                   public void run() {
                         adapter.notifyDataSetChanged();
                   }
                       
      });

after updating or deleting to update the ListView with new changes. I guess there is a better way to do this but for now I think it is ok.

Here are some of the screen shots I made developing this small application.


There was an extra button for category. I removed it.

Add product functionality.

update and delete functionality

Test on Nexus 7 AVD

Tuesday, July 2, 2013

Playing around with Android

After some playing with my code on CheckerBoard application, I got to some interesting results.

I wanted to cover all colors from the visible spectre but didn't had the real success . Anyway here is what I achieved so far :)


I used some settings in Android manifest like:

android:screenOrientation="portrait"
android:theme="@android:style/Theme.NoTitleBar.Fullscreen"

in the activity tag. The first one makes sure your app always runs in portrait mode. The second removes the title bar with the battery and notifictaions area.


For publishing an update to the same application you should export your application with changed version code number in AndroidManifest.xml like this:

<manifest xmlns:android="http://schemas.android.com/apk/res/android"
android:versionCode="2"

If your version code was 1, make it 2, if it was 2 make it 3 and so on...
 

Sunday, June 30, 2013

Signing and publishing your app on Google play

In this post I will explain how to self sign your application and how to publish it on Google Play store.

First you must signup for a developers account here .It is a fee of $25 that you pay only once and your account will exist as long as it is not closed i.e for a lifetime. After you finish registration, you will be redirected to a screen for uploading new application. But before you upload your app you must be sure that it is signed and zip aligned apk package.

Using Eclipse it is very easy to sign and zip align your application. There are two types of signing: debug and release.

Debug signing:

When installing Android plugin for eclipse, one debug keystore (debug.keystore) is generated for you and it is located in Users/username/.android folder on Windows. You cannot run your apps even on AVD unless they are signed. But since there is debug keystore trough eclipse, you can test your apps without problems. Note that you can use keytool in java sdk bin folder to generate key for you manually.

Release signing:

About release signing you can again use Eclipse to generate new keystore and your key with your password and therefore sign you application for publishing. Just follow the instructions in Eclipse after clicking right click on the app project node in Package explorer and then selectiong Export menu item. In the next window select Android -> Export Android application.
Once you have signed your app it is ready for publishing.

Publishing your application

Go to this page for publishing. Click add new application to create your Google play application. Choose language and call it MyTestApp. Press upload APK. Give the new app a description, add two bigger images for the specific device that you plan your app to work on and also don't forget app icon 512x512 size. Choose App type, Category and Content rating. Add your website and email and click save. You are one step closer to publishing. Now on the left menu click Pricing and Distribution.

Select all countries and choose below options as you like. I choosed only the last two. Click save.

Now go up and on the right click publish button. You are done, now several hours are necesary before your app becomes available on Google Play.

Cheers :)))

First Android Application

In this short tutorial I will show you how to convert the screen of your Nexus 7 into checker board.

I assume you have installed java 1.6 or 1.7, Eclipse classic (Juno) with plugin for Android and these Android packages: Android 4.2.2, 4.0.3 and 2.3.3 with SDK, Documentation, Google APIs, ARM EABI, Samples for SDK and Tools all 3 packages.

First create Android application in Eclipse and call it CheckerBoardApp. Leave everything default except when creating the project set Theme to none. You can also rename the java package from example to... lets say CheckerBoardPkg or you can leave it default.For publishing your app on Google Play you must change the package name to something different than example because it will not be accepted

Once you have the new application generated add new java class in the main src folder and call it CheckerBoard.

Add this code in it and save:

package com.checkerboardpkg.checkerboardapp;

import android.content.Context;
import android.graphics.Canvas;
import android.graphics.Color;
import android.graphics.Paint;
import android.view.View;

public class CheckerBoard extends View {

    private final int TILE_WIDTH_HEIGHT = 160;
    private Paint currentPaint = null;
   
    public CheckerBoard(Context context) {
        super(context);
        currentPaint = new Paint();
        setFocusable(true);

    }

    @Override
    protected void onDraw(Canvas canvas) {

        canvas.drawColor(Color.BLACK);

        int currentColor = 0;
       
        for (int i = 0; i < 8; i += 1) {
            for (int j = 0; j < 5; j += 1) {
               
                // set up color and Paint object
                if ((i + j) % 2 == 0) {
                    currentColor = Color.WHITE;
                } else {
                    currentColor = Color.BLACK;
                }
                currentPaint.setAntiAlias(true);
                currentPaint.setColor(currentColor);
               
                // draw rectangles to form checker board
                canvas.drawRect(j * this.TILE_WIDTH_HEIGHT, i
                        * this.TILE_WIDTH_HEIGHT, (j + 1)
                        * this.TILE_WIDTH_HEIGHT, (i + 1)
                        * this.TILE_WIDTH_HEIGHT, currentPaint);
            }
        }
    }
}


Basically what we do here is we create 8 rows and 5 columns of rectangles into the Canvas. We check the counters i and j if their sum is even or odd number and we change the color to white and than black appropriatelly. Each rectangle is 160x160 pixels so we get exactly 800x1280 screen which is the exact size of Nexus 7 screen resolution.


Now you must set the content of main acitivity to be the CheckerBoard view. We do that by adding this line

setContentView(new CheckerBoard(this));

as last statement in

@Override
    protected void onCreate(Bundle savedInstanceState) {
        super.onCreate(savedInstanceState);
        setContentView(R.layout.activity_main);
        setContentView(new CheckerBoard(this));
    }

function in MainActivity.java class.

Now the code is ready but to see it in action you must create Android Virtual Machine to run it on.
In Eclipse press Window -> Android Virtual Device Manager and that click New. Name it Nexus7AVD, Device: Nexus 7, target: Android 4.2.2, and set RAM to 512. It is 1024 by default but it may not start up if on Windows with low memory. Set SD card to 100 MB. Click OK.

Then press start and then launch. Wait some time while the AVD is not started. After you see the batery icon on top, your AVD is ready to run so go to Eclipse and right click on the project node in package explorer and click Run as -> Android Application.

Here is what you should see:


Mine app was called TileGame, but you should see CheckerBoardApp instead